Developer Guide
- Setting up, getting started
- Design
- Implementation
- Documentation, logging, testing, configuration, dev-ops
- Appendix: Requirements
- Appendix: Instructions for manual testing
Setting up, getting started
Refer to the guide Setting up and getting started.
Design
Architecture

The Architecture Diagram given above explains the high-level design of the App. Given below is a quick overview of each component.
.puml files used to create diagrams in this document can be found in the diagrams folder. Refer to the PlantUML Tutorial at se-edu/guides to learn how to create and edit diagrams.
Main has two classes called Main and MainApp. It is responsible for,
- At app launch: Initializes the components in the correct sequence, and connects them up with each other.
- At shut down: Shuts down the components and invokes cleanup methods where necessary.
Commons represents a collection of classes used by multiple other components.
The rest of the App consists of four components.
-
UI: The UI of the App. -
Logic: The command executor. -
Model: Holds the data of the App in memory. -
Storage: Reads data from, and writes data to, the hard disk.
Each of the four components,
- defines its API in an
interfacewith the same name as the Component. - exposes its functionality using a concrete
{Component Name}Managerclass (which implements the corresponding APIinterfacementioned in the previous point.
For example, the Logic component (see the class diagram given below) defines its API in the Logic.java interface and exposes its functionality using the LogicManager.java class which implements the Logic interface.

How the architecture components interact with each other
The Sequence Diagram below shows how the components interact with each other for the scenario where the user issues the command delete 1.

The sections below give more details of each component.
UI component

API :
Ui.java
The UI consists of a MainWindow that is made up of parts e.g.CommandBox, ResultDisplay, PersonListPanel, StatusBarFooter etc. All these, including the MainWindow, inherit from the abstract UiPart class.
The UI component,
- Executes user commands using the
Logiccomponent. - Listens for changes to
Modeldata so that the UI can be updated with the modified data.
UI Styling
The UI component uses JavaFX UI framework. The layout of these UI parts are defined in matching .fxml files that are in the src/main/resources/view folder. For example, the layout of the MainWindow is specified in MainWindow.fxml.
The MainWindow FXML file also references a CSS stylesheet TaskerTheme.css, which gives the JavaFX UI component modularity with certain UI variables (e.g. primary colors, etc.).
At the CSS file’s header, we have:
* {
  -fx-tasker-base-color: #ffffff;
  -fx-tasker-base-color-darker: #ffffff;
  -fx-tasker-font-family: -apple-system, BlinkMacSystemFont, "Segoe UI", Roboto,
    Helvetica, Arial, sans-serif, "Apple Color Emoji", "Segoe UI Emoji",
    "Segoe UI Symbol";
  -fx-primary-color: #00089c;
  -fx-primary-lighter: #99cfff;
  -fx-primary-bg: #bde0ff;
}
The font-family has been set to the default sans-serif fonts of respective operating systems, so that the displayed font will be consistent with the user’s browsing experiences on other applications, providing a sense of familiarity when interacting with the UI.
CSS variables like the base color or font-family are set in the root CSS class (*), and these variables can be referenced by other CSS selectors.
For example:
#resultDisplay {
  -fx-font-family: -fx-tasker-font-family;
  /* other CSS styles */
}
The CSS stylesheet also offers developers advanced control over the appearance of intermediate states (hovered, selected, etc.) with CSS pseudo-classes.
For example:
#commandTextField {
  -fx-border-color: -fx-primary-lighter;
  /* other CSS properties */
}

#commandTextField:hover {
  -fx-border-color: -fx-primary-color;
}

#commandTextField:focused {
  -fx-border-color: -fx-primary-color;
}
This gives us finer control over the UI appearance, to create a more interactive UI that better responds to the user’s interactions.
Logic component

API :
Logic.java
-
Logicuses theAddressBookParserclass to parse the user command. - This results in a
Commandobject which is executed by theLogicManager. - The command execution can affect the
Model(e.g. adding a person). - The result of the command execution is encapsulated as a
CommandResultobject which is passed back to theUi. - In addition, the
CommandResultobject can also instruct theUito perform certain actions, such as displaying help to the user.
Given below is the Sequence Diagram for interactions within the Logic component for the execute("delete 1") API call.

DeleteCommandParser should end at the destroy marker (X) but due to a limitation of PlantUML, the lifeline reaches the end of diagram.
Model component

API : Model.java
The Model,
- stores a
UserPrefobject that represents the user’s preferences. - stores the address book data.
- exposes an unmodifiable
ObservableList<Person>that can be ‘observed’ e.g. the UI can be bound to this list so that the UI automatically updates when the data in the list change. - does not depend on any of the other three components.
Tag list in the Tasker, which Person references. This allows Tasker to only require one Tag object per unique Tag, instead of each Person needing their own Tag object.
Storage component

API : Storage.java
The Storage component,
- can save
UserPrefobjects in json format and read it back. - can save the address book data in json format and read it back.
Common classes
Classes used by multiple components are in the seedu.addressbook.commons package.
Implementation
This section describes some noteworthy details on how certain features are implemented.
View all student data
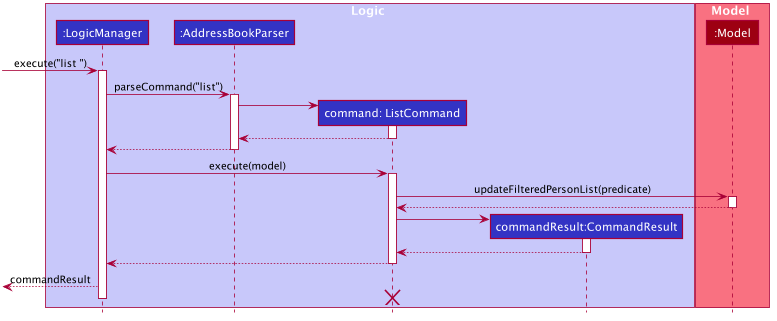
Querying the data of all current students in TAsker is really simple. Once the list command is inputted, the name,
phone number, telegram tag, matric number, email, tutorial classes and attendance record of all students are displayed
on TAsker’s GUI.
Sequence of action
-
LogicManagerprocesses the user input “list”. - AddressBookParser is called with it’s
parseCommand(userInput)method to parse input, which returns a newListCommandobject - Next,
Logicmanagercalls our newListCommandobject’sexecutemethod with themodelfield ofLogicManageras input. - Within the
ListCommand#executemethod, themodelfield calls its ownupdateFilteredPersonListmethod to update the list to show all persons. - Lastly, a new
CommandResultwith the relevant success message is finally returned toLogicManager.
All of these details and interactions are captured in the sequence diagram below.
Find a student’s data
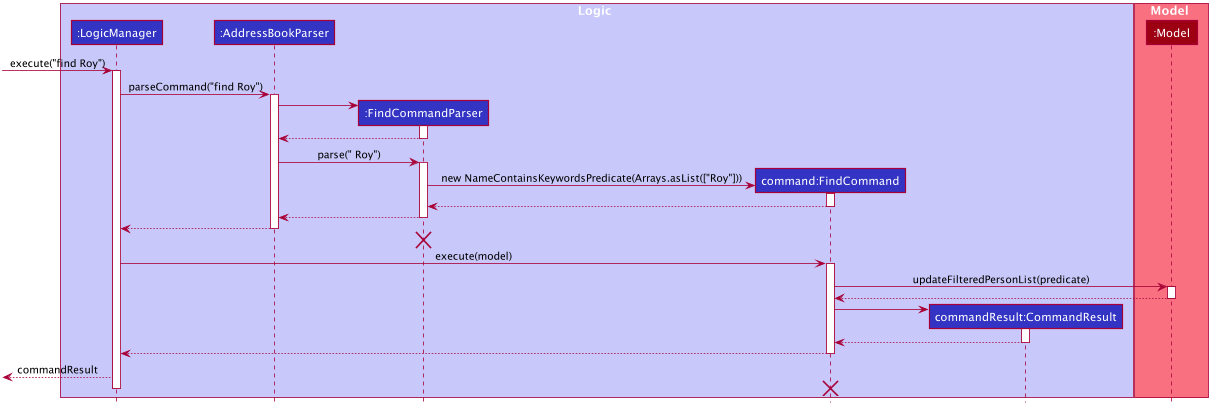
Querying the data of a specific student in TAsker is just as simple as finding all. Once the find <NAME> command
is inputted, the name, phone number, telegram tag, matric number, email, tutorial classes and attendance record of the
specific student is displayed on TAsker’s GUI.
Sequence of action
-
LogicManagerprocesses the user input “find Roy”, for example. - AddressBookParser is called with it’s
parseCommand(userInput)method to parse input, which in turns creates a newFindCommandParserobject. - The
FindCommandParserobject calls its ownparsemethod with the" Roy"as input. - Now, the
" Roy"argument is broken down into its individual strings, with whitespace removed and into an array, which is processed and used as predicate for filtering out the desired student. -
Logicmanagercalls ourFindCommandobject’sexecutemethod with themodelfield ofLogicManageras input. - Within the
FindCommand#executemethod, themodelfield calls its ownupdateFilteredPersonListmethod to update the list to retrieve the relevant person. - Lastly, a new
CommandResultwith the relevant message is finally returned toLogicManager.
All of these details and interactions are captured in the sequence diagram below.
Update Student data
TAsker also supports the updating of student data. With the aforementioned extension of fields, the update feature now
encompasses both the MatricNumber and Telegram fields as well.
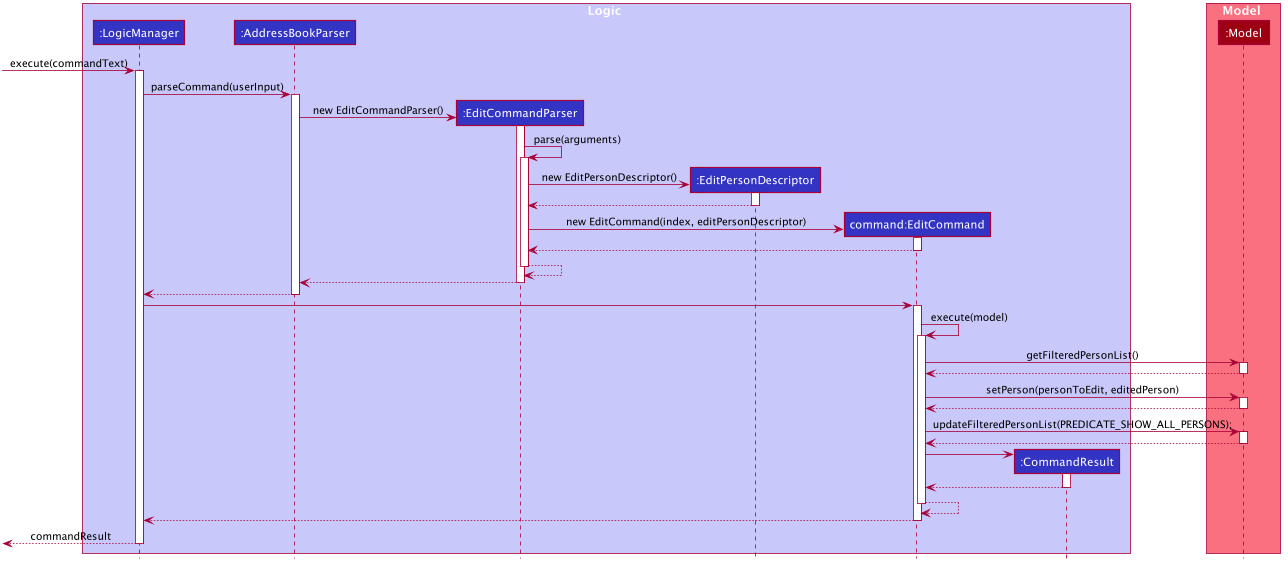
When the edit <INDEX_TO_UPDATE> <FIELDS_TO_UPDATE> command is inputted, the fields provided in <FIELDS_TO_UPDATE>
will be updated for the student with the specific <INDEX_TO_UPDATE> on the GUI.
Fields in <FIELDS_TO_UPDATE> should adhere to the following syntax:
| Field | Syntax |
|---|---|
| Name | n/< NAME > |
| Phone Number | p/< PHONE > |
| e/< EMAIL > | |
| Telegram User | t/< TELEGRAM > |
| Matric Number | m/< MATRIC_NUMBER > |
| Tag | tg/< TAG > |
More than one tag can be provided and inputting tg/ without specifying any tags after it removes all existing tags.
Sequence of action
-
LogicManagerprocesses the user input, for instance"edit 1 p/91234567 m/A1234567Z", with theLogicManager#execute(commandText)method. -
AddressBookParseris then called with it’sparseCommand(userInput)method to parse input, which in turns creates a newEditCommandParserobject. - The
EditCommandParserobject calls its ownparsemethod with" 1 p/91234567 m/A1234567Z"as input. - Now, the
" 1 p/91234567 m/A1234567Z"argument is broken down into anIndexand tokens in anArgumentMultiMapbased on the field prefixes. Subsequently, anEditPersonDescriptorobject is created and used to store the fields that are present in theArgumentMultiMap. - For valid inputs, an
EditCommandobject is then created with theIndexandEditPersonDescriptoras inputs. - Our new
EditCommandobject calls its ownexecutemethod with themodelfield ofLogicManageras input. - Lastly, a new
CommandResultwith the relevant message is finally returned toLogicManager.
All of these details and interactions are captured in the sequence diagram below.
Create Student data
TAsker now supports creating student data as well. We extended TAsker with 2 relevant fields,
MatricNumber and Telegram which track their matriculation numbers and Telegram handles respectively.
Using regexes to validate our fields
To ensure the correct fields are included, we have introduced regexes for Matriculation numbers and telegram handles which perform the validation for us.
-
Matriculation number validation regex
^A\\d{7}[A-Z]$^means to match from the start of the line.Ameans the first letter should be ‘A’.\\d{7}means there should be 7 digits from 0 to 9. Note that Java uses\\drather than\dto escape the\character from the string.[A-Z]means that the last character should be one of A to Z. -
Telegram handle validation regex
^[a-zA-Z0-9_-]{5,32}$^means to match from the start of the line.[a-zA-Z0-9_-]means we accept alphanumeric characters, including capital letters. We also accept-and-.[...]{5, 32}means we expect the string to contain between 5 to 32 (inclusive) of the above characters.
Implementing this is rather straightforward since we can reference other fields (address, name, …) we use.
Builder pattern
Another notable aspect is the Builder pattern we use for tests.
Thanks to this abstraction, refactoring tests for Person was relatively straightforward.
To illustrate this, suppose we have a test using Person class.
class Test {
  test() {
     // Person with valid name
     assertEq(parsePerson("James,james@abc.xyz"), new Person("James", "james@abc.xyz"));
     // Person with valid email
     assertEq(parsePerson("Zack,zack@abc.xyz"), new Person("Zack", "zack@abc.xyz"));
  }
}
Now we add the two fields, MatricNumber and Telegram to Person and we have to update our tests:
class Test {
  test() {
     // Person with valid name
     assertEq(
         parsePerson("James,james@abc.xyz"),
         new Person("James", "james@abc.xyz", "A0001111B", "james_lee") // Update 1
     );
     // Person with valid email
     assertEq(
         parsePerson("Zack,zack@abc.xyz"),
         new Person("Zack", "zack@abc.xyz", "A0002222B", "zack_koh") // Update 2
     );
  }
}
Note that we had to update at 2 areas with mock MatricNumber and Telegram handle.
We are only concerned about valid name and email, so we shouldn’t have to update these!
PersonBuilder introduces default values for fields we don’t want to test.
With PersonBuilder:
class Test {
  test() {
     // Person with valid name
     assertEq(
         parsePerson("James,james@abc.xyz"),
         new PersonBuilder.addName("James").addEmail("james@abc.xyz").build()
     );
     // Person with valid email
     assertEq(
         parsePerson("Zack,zack@abc.xyz"),
         new PersonBuilder.addName("Zack").addEmail("zack@abc.xyz").build()
     );
  }
}
After we add MatricNumber and Telegram fields in Person we can update PersonBuilder with these:
class PersonBuilder {
    // ...

    PersonBuilder() {
        // ...
        matricNumber = DEFAULT_MATRIC_NUMBER;
        telegram = DEFAULT_TELEGRAM;
    }

    Person addMatricNumber(String matricNumber) { /* ... */ }
    Person addTelegram(String telegram) { /* ... */ }
}
All our existing tests using PersonBuilder will still work, and all we had to do was update definitions in PersonBuilder.
Show attendance
Sequence of action
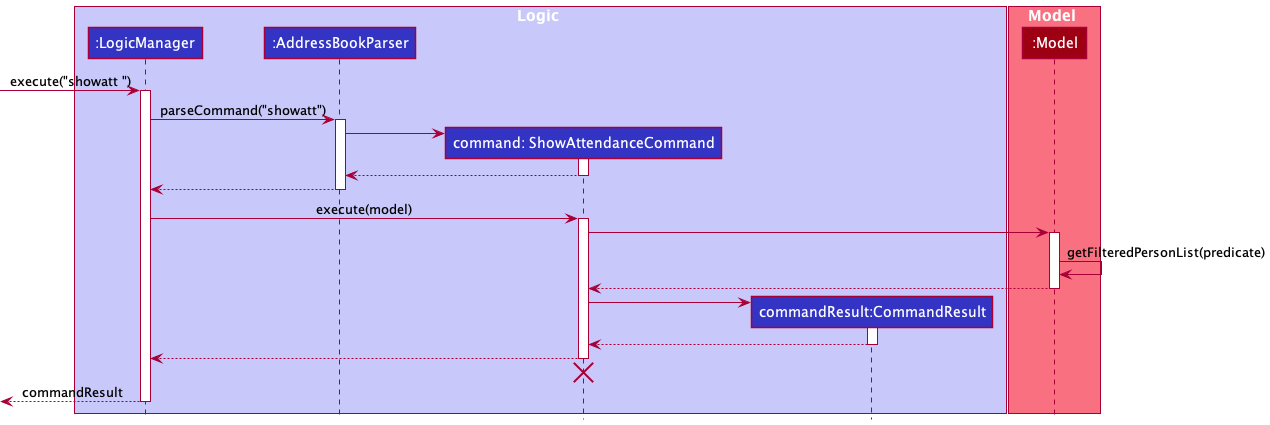
Shows if a student is present on a specific day.
- Parse the
showattcommand - Get the person list (
lastShownList) withmodel.getFilteredPersonList() - Get the person at the index with
lastShownList.get(targetIndex.getZeroBased()) -
Check if the student has attended at a specific date by calling:
boolean hasAttended = attendances .stream() .anyMatch(attendance1 -> attendance1.equals(attendance)); - If no such person exists, return a message indicating the person is absent
- Otherwise return a message indicating the person is present on that day.
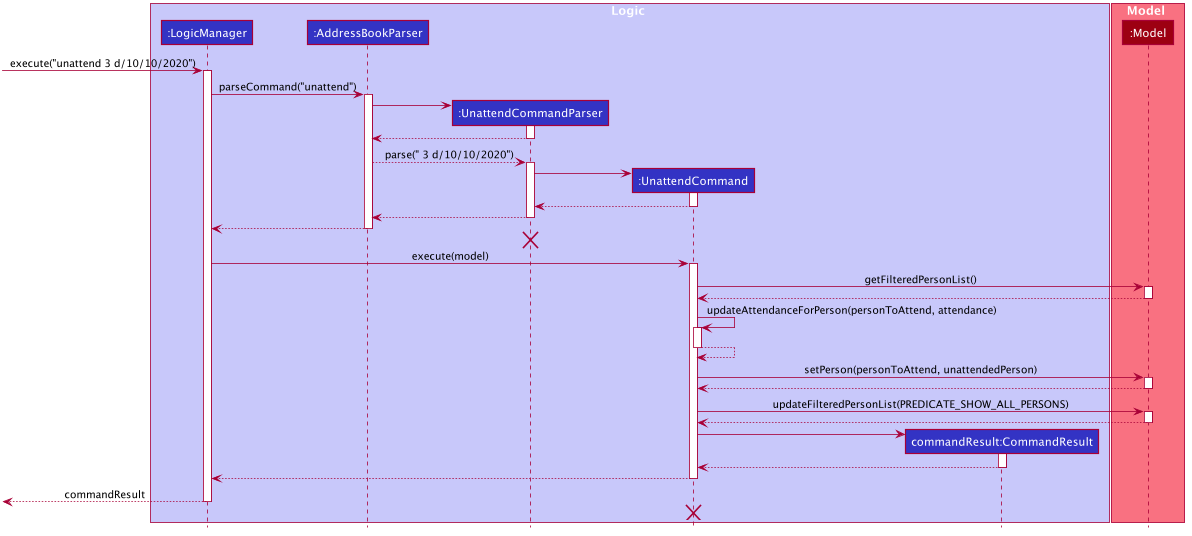
Unmark a student’s attendance
This command removes the specified date from a student’s attendance list. TAsker’s attendance tab on the GUI will simply remove the specified date from the displayed list. This removal is only visible if the student has been marked to attend on the given date previously. Else no new changes are observed.
Sequence of action
-
LogicManagerprocesses the user input “unattend 3 d/10/10/2020”, for example. - AddressBookParser is called with it’s
parseCommand(userInput)method to parse input, which in turns creates a newUnattendCommandParserobject. - The
UnattendCommandParserobject calls its ownparsemethod with the" 3 d/10/10/2020"as input. - Now, the
" 3 d/10/10/2020"argument is broken down into its individual components, which is processed and used as predicate for filtering out the desired student, as well as the date to unattend. - A
UnattendCommandobject is created as well. - Within the
UnattendCommand#executemethod, themodelfield calls its owngetFilteredPersonListmethod to retrieve the student to unattend. - Next,
ListCommandobject calls its ownupdateAttendanceForPersonmethod to create the replacing, unattended Person object for the target Person object. - After that, the
setPerson&updateFilteredPersonListmethods of model are invoked to update the current Person collection. - Lastly, a new
CommandResultwith the relevant message is finally returned toLogicManager.
All of these details and interactions are captured in the sequence diagram below.
Export attendance
The ExportAttendanceCommand writes a new csv to data/attendance_{CURRENT_DATE}_{CURRENT_TIME}.csv. The csv columns headers are the names of the students and the rows are the dates. Each cell is marked with ATTENDED or ABSENT depending on whether the attendance for that student on that particular date has been marked.
The details of the implementation are as follows. First, we iterate through each student, calling person.getAttendances and adding the resulting attendances to a TreeSet called allAttendances that will contain all the dates in sorted order so we can form the rows of the csv. We also create a new HashSet of Attendance for each student, stored in an ArrayList so that the queries for the following part can be made faster. Next, we go through each date in allAttendances, and iterate through the ArrayList of HashSet of Attendance. If a date exists in that HashSet, the cell corresponding to the student and date will be marked as ATTENDED, and ABSENT otherwise.
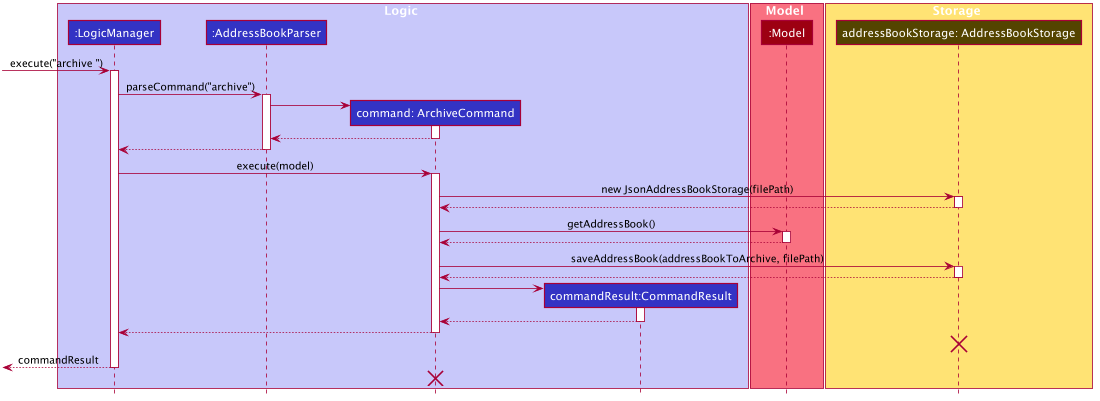
Archive command
Enables users to quickly create a backup copy of their data in TAsker, saved in tasker_<date>_<hhmm>.json format, for users to expedite the freshness of their data.
Sequence of action
-
LogicManagerprocesses the user input “archive”, for example. - AddressBookParser is called with it’s
parseCommand(userInput)method to parse input, which in turns creates a newArchiveCommandobject. -
LogicManagerthen calls theexecutemethod ofArchiveCommand. - Within the
ArchiveCommand#executemethod, a newAddressBookStorageobject is created as & themodelfield uses its getter method to retrieve theReadOnlyAddressBookobject from the latter. the student to unattend. - Next, the
AddressBookStoragecalls itssavemethod to save the recently retrievedReadOnlyAddressBook. - Lastly, a new
CommandResultwith the relevant message is finally returned toLogicManager.
All of these details and interactions are captured in the sequence diagram below.
[Proposed] Undo/redo feature
Proposed Implementation
The proposed undo/redo mechanism is facilitated by VersionedAddressBook. It extends Tasker with an undo/redo history, stored internally as an addressBookStateList and currentStatePointer. Additionally, it implements the following operations:
-
VersionedAddressBook#commit()— Saves the current address book state in its history. -
VersionedAddressBook#undo()— Restores the previous address book state from its history. -
VersionedAddressBook#redo()— Restores a previously undone address book state from its history.
These operations are exposed in the Model interface as Model#commitAddressBook(), Model#undoAddressBook() and Model#redoAddressBook() respectively.
Given below is an example usage scenario and how the undo/redo mechanism behaves at each step.
Step 1. The user launches the application for the first time. The VersionedAddressBook will be initialized with the initial address book state, and the currentStatePointer pointing to that single address book state.

Step 2. The user executes delete 5 command to delete the 5th person in the address book. The delete command calls Model#commitAddressBook(), causing the modified state of the address book after the delete 5 command executes to be saved in the addressBookStateList, and the currentStatePointer is shifted to the newly inserted address book state.

Step 3. The user executes add n/David … to add a new person. The add command also calls Model#commitAddressBook(), causing another modified address book state to be saved into the addressBookStateList.

Model#commitAddressBook(), so the address book state will not be saved into the addressBookStateList.
Step 4. The user now decides that adding the person was a mistake, and decides to undo that action by executing the undo command. The undo command will call Model#undoAddressBook(), which will shift the currentStatePointer once to the left, pointing it to the previous address book state, and restores the address book to that state.

currentStatePointer is at index 0, pointing to the initial Tasker state, then there are no previous Tasker states to restore. The undo command uses Model#canUndoAddressBook() to check if this is the case. If so, it will return an error to the user rather
than attempting to perform the undo.
The following sequence diagram shows how the undo operation works:

UndoCommand should end at the destroy marker (X) but due to a limitation of PlantUML, the lifeline reaches the end of diagram.
The redo command does the opposite — it calls Model#redoAddressBook(), which shifts the currentStatePointer once to the right, pointing to the previously undone state, and restores the address book to that state.
currentStatePointer is at index addressBookStateList.size() - 1, pointing to the latest address book state, then there are no undone Tasker states to restore. The redo command uses Model#canRedoAddressBook() to check if this is the case. If so, it will return an error to the user rather than attempting to perform the redo.
Step 5. The user then decides to execute the command list. Commands that do not modify the address book, such as list, will usually not call Model#commitAddressBook(), Model#undoAddressBook() or Model#redoAddressBook(). Thus, the addressBookStateList remains unchanged.

Step 6. The user executes clear, which calls Model#commitAddressBook(). Since the currentStatePointer is not pointing at the end of the addressBookStateList, all address book states after the currentStatePointer will be purged. Reason: It no longer makes sense to redo the add n/David … command. This is the behavior that most modern desktop applications follow.

The following activity diagram summarizes what happens when a user executes a new command:

Design consideration:
Aspect: How undo & redo executes
-
Alternative 1 (current choice): Saves the entire address book.
- Pros: Easy to implement.
- Cons: May have performance issues in terms of memory usage.
-
Alternative 2: Individual command knows how to undo/redo by itself.
- Pros: Will use less memory (e.g. for
delete, just save the person being deleted). - Cons: We must ensure that the implementation of each individual command are correct.
- Pros: Will use less memory (e.g. for
{more aspects and alternatives to be added}
[Proposed] Data archiving
{Explain here how the data archiving feature will be implemented}
Command History
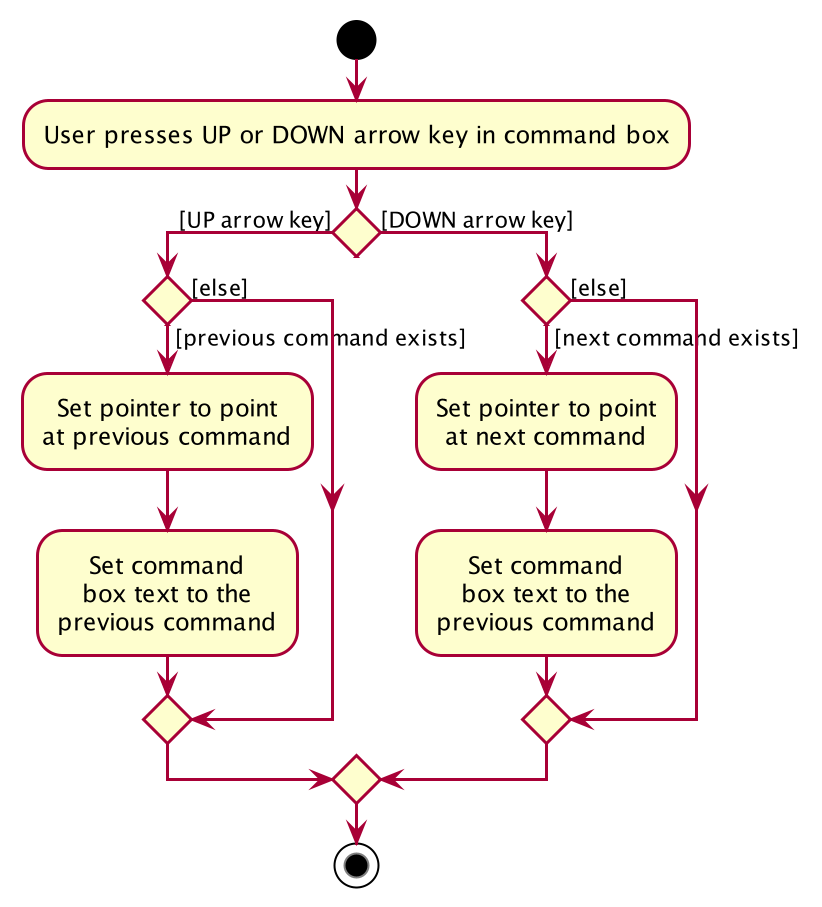
The command history helps users to keep track of previously-entered commands. This allows the users to easily edit and re-run previously run commands. Users can browse between previously run commands by pressing on the ↑ and ↓ keys in the command box.
Implementation
The feature is implemented via CommandHistory, which internally, maintains a list of previously run commands stored as a list of String, as well as a integer pointer that keeps track of which command the user is focused on.
CommandHistory only saves the commands that are run during the current user-session, to memory. That is, the command history will not persist after the application is exited.
CommandHistory is implemented following the Singleton design pattern, because the application should only have one command history, and hence should only allow for the instantiation of one command history.
On application launch, CommandHistory is initialised with an empty list, for its internal command storage mechanism. The pointer will also be set to the size of the list, so that the pointer will always point at the last-run command.
Whenever a command is run, regardless of whether it is a valid or invalid command, the command will be added to CommandHistory, and the pointer will be set to the size of the list again.
![]() Note: This makes the pointer be a out-of-bounds index of the internal list of commands. However, this is planned and intentional, as the accessor methods for the list will never access out-of-bounds indices.
Note: This makes the pointer be a out-of-bounds index of the internal list of commands. However, this is planned and intentional, as the accessor methods for the list will never access out-of-bounds indices.
When the command box is focused and whenever the user presses the ↑ key, CommandHistory will try to fetch the previous command. When fetching the previous command, it first checks if the history is empty. If the history is empty, the text in the command box will not be modified. However, if the history is not empty, the previous command will be returned and be set as the command box command, and the pointer will be set to point at the previous command of the previous command.
![]() Note: Fetching the previous command also “rolls-over” the pointer to the most-recently run command if the least-recently run command is already pointed it. This also ensures that we will never access invalid list indices.
Note: Fetching the previous command also “rolls-over” the pointer to the most-recently run command if the least-recently run command is already pointed it. This also ensures that we will never access invalid list indices.
Likewise for when the command box is focused and whenever the user presses the ↓ key, CommandHistory will try to fetch the next command. When fetching the next command, it first checks if the history is empty. If the history is empty, the text in the command box will not be modified. However, if the history is not empty, the next command will be returned and be set as the command box command, and the pointer will be set to point at the next command of the next command.
![]() Note: Same as before, fetching the next command also “rolls-over” the pointer to the least-recently run command if the most-recently run command is already pointed it. This also ensures that we will never access invalid list indices.
Note: Same as before, fetching the next command also “rolls-over” the pointer to the least-recently run command if the most-recently run command is already pointed it. This also ensures that we will never access invalid list indices.
Additionally, whenever a previous/next command is successfully fetched and set as the command box text, the command box cursor will also be set to be at the end of the command, to provide greater ease in editing the remembered commands.
Note that the behavior of CommandHistory is also changes depending on whether the last-run command is parsed successfully. The default behavior of the command box is to retain the errored command if it cannot be parsed correctly instead of wiping the errored command. In this case, it would provide an inferior user experience if the user presses ↑, and realises that the same command (the errored command) is fetched from the command history, as the user will see no visual change. To avoid this, if there is a command parsing failure, we shift the pointer to point at the previous-run command instead of the most-recent run command.
The activity diagram below provides a summary of the command history mechanism:
Design Considerations
Aspect: Browsing behaviour of command history when at the ends
Two possible behaviours were considered when designing the interaction of the command history, when the pointer has reached the ends of the history (i.e. when the pointer is at the least-recent and most-recent commands)
-
Alternative 1 (current choice): At the ends, “roll-over” at advance the pointer to the other end
- Pros:
- Easy to implement
- Less bug-prone (since you will never access out-of-bounds indices)
- Cons:
- Might feel a little unintuitive for the user if they press ↓ and end up at the least-recent command
- Does not follow the behaviour of common CLI tools like the Unix shell
- Pros:
-
Alternative 2: Limit the command history from advancing, at the ends
- Pros:
- Might provide a more natural user experience
- Cons:
- More bug-prone
- More difficult to implement
- Pros:
Alternative 1 was chosen as it suited our development timeline better, and was less prone to bugs. This will be a tech-debt that we will take on and track. There are plans to refactor this code to Alternative 2 sometime in the future, as it will provide a more consistent and intuitive experience for our user.
Documentation, logging, testing, configuration, dev-ops
Appendix: Requirements
Product scope
Target user profile (user persona):
Name: Jane
Age: 19
Undergraduate NUS CS Student, and a part-time teaching assistant
- is a teaching assistant for CS modules
- is busy because she is a overachieving student with lots of modules
- needs to take attendance
- needs to keep track of student’s assignments and their submission status
- prefer desktop apps over other types
- can type fast
- codes a lot, so she prefers keyboard-based interfaces
Value proposition: TAs can track students’ details and submissions in a efficient and structured manner
User stories
Priorities: High (must have) - * * *, Medium (nice to have) - * *, Low (unlikely to have) - *
| Priority | As a … | I want to … | So that I can… |
|---|---|---|---|
* * * |
user | CRUD student details into my data | add/remove my students data when they join/drop the module |
* * * |
user | CRUD my students’ attendance | |
* * * |
user | CRUD my students’ assignments & status | keep track of my students’ assignment’s submission status |
* * |
user | CRUD my student’s consultation requests | keep track of my students’ consultation requests |
* * |
user | view all my upcoming consultations for the week, in chronological order | keep track of when my consultations are supposed to happen |
* * |
user | mark when I end each of my consultations | keep track of the time elapsed of each consultation session |
* |
user | generate a summary of my weekly consultation hours | keep track of the total amount of consultation time, for claiming purposes |
* |
new user | see usage instructions | refer to instructions when I forget how to use the App |
{More to be added}
Use cases
(For all use cases below, the System is TAsker and the Actor is the user, unless specified otherwise)
Use case: List all students
MSS
- User requests to list students
-
TAsker shows a list of students
Use case ends.
Extensions
-
2a. The list is empty.
Use case ends.
Use case: Add a student
MSS
- User requests to list students
- TAsker shows a list of students
- User requests to add a specific student to the list
-
TAsker adds the student to the list
Use case ends.
Extensions
-
2a. The student’s details are insufficient/cannot be parsed.
-
2a1. TAsker shows an error message.
Use case resumes at step 2.
-
Use case: Delete a student
MSS
- User requests to list students
- TAsker shows a list of students
- User requests to delete a specific student in the list
-
TAsker deletes the student
Use case ends.
Extensions
-
2a. The list is empty.
Use case ends.
-
3a. The given index is invalid.
-
3a1. TAsker shows an error message.
Use case resumes at step 2.
-
Use case: Update a student’s details
MSS
- User requests to list students
- TAsker shows a list of students
- User requests to update a specific student’s details in the list
-
TAsker updates the student’s details
Use case ends.
Extensions
-
2a. The given index is invalid.
-
2a1. TAsker shows an error message.
Use case resumes at step 2.
-
-
3a. The student’s details are insufficient/cannot be parsed.
-
3a1. TAsker shows an error message.
Use case resumes at step 2.
-
Use case: See all assignment statuses
MSS
- User requests to list students
-
TAsker shows a list of students, with their assignment statuses
Use case ends.
Extensions
-
2a. No assignments are added.
-
2a1. TAsker will just show the student’s information
Use case resumes at step 2.
-
Use case: Add an assignment
MSS
- User requests to add a assignment to the list
-
TAsker adds the assignment to the list
Use case ends.
Use case: Delete an assignment
MSS
- User requests to list students
- TAsker shows a list of students, with their assignment statuses
- User requests to delete an assignment from the list
-
TAsker deletes the assignment from the list
Use case ends.
Extensions
-
2a. The given assignment is invalid.
-
2a1. TAsker shows an error message.
Use case resumes at step 2.
-
Use case: Update a student’s assignment submission status
MSS
- User requests to list students
- TAsker shows a list of students, along with their assignment statuses
- User requests to update a specific student’s assignment submission status
-
TAsker updates the specific student’s assignment submission status
Use case ends.
Extensions
-
2a. The given index is invalid.
-
2a1. TAsker shows an error message.
Use case resumes at step 2.
-
-
3a. The given assignment is invalid.
-
3a1. TAsker shows an error message.
Use case resumes at step 2.
-
-
4a. The given assignment status is invalid.
-
4a1. TAsker shows an error message.
Use case resumes at step 2.
-
{More to be added}
Non-Functional Requirements
- Should be able to work offline, without any internet connection requirement.
- Should work on any mainstream OS as long as it has Java
11or above installed. - Should be able to hold up to 1000 persons without a noticeable sluggishness in performance for typical usage.
- Should not be too bright or even have a dark mode, at night timings.
- A user with above average typing speed for regular English text (i.e. not code, not system admin commands) should be able to accomplish most of the tasks faster using commands than using the mouse.
{More to be added}
Glossary
- Mainstream OS: Windows, Linux, Unix, macOS
- Private contact detail: A contact detail that is not meant to be shared with others
- TA: Teaching Assistant
- CS: Computer Science
- CRUD: Create, Read, Update, Delete
Appendix: Instructions for manual testing
Given below are instructions to test the app manually.
Launch and shutdown
-
Initial launch
-
Download the jar file and copy into an empty folder
-
Double-click the jar file Expected: Shows the GUI with a set of sample contacts. The window size may not be optimum.
-
-
Saving window preferences
-
Resize the window to an optimum size. Move the window to a different location. Close the window.
-
Re-launch the app by double-clicking the jar file.
Expected: The most recent window size and location is retained.
-
-
{ more test cases … }
Deleting a person
-
Deleting a person while all persons are being shown
-
Prerequisites: List all persons using the
listcommand. Multiple persons in the list. -
Test case:
delete 1
Expected: First contact is deleted from the list. Details of the deleted contact shown in the status message. Timestamp in the status bar is updated. -
Test case:
delete 0
Expected: No person is deleted. Error details shown in the status message. Status bar remains the same. -
Other incorrect delete commands to try:
delete,delete x,...(where x is larger than the list size)
Expected: Similar to previous.
-
-
{ more test cases … }
Saving data
-
Dealing with missing/corrupted data files
- {explain how to simulate a missing/corrupted file, and the expected behavior}
-
{ more test cases … }